A 4-step setup that replaces a $200/month add-on — using features you’re already paying for.
Estimated read time: 6 minutes
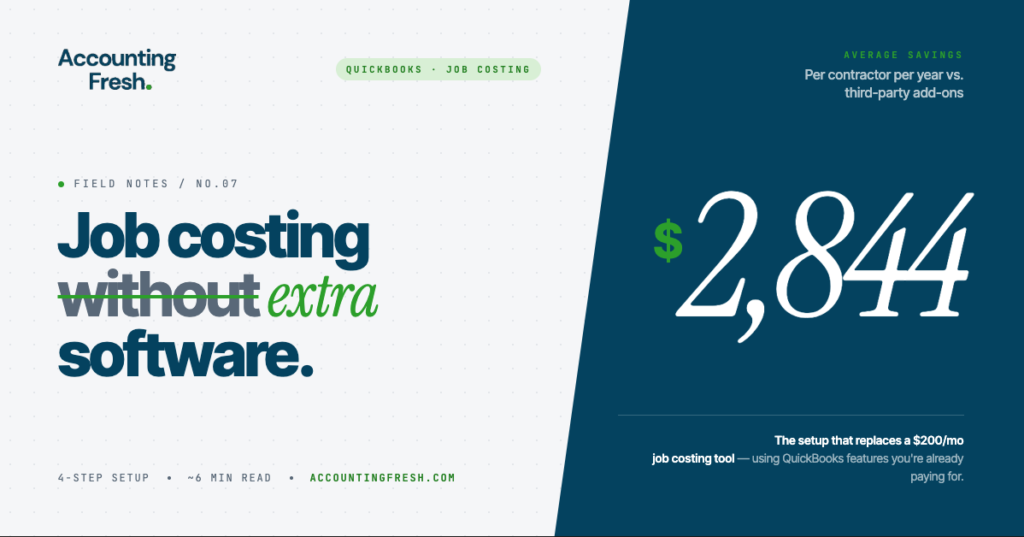
A client called me last month, frustrated. She runs a small contracting business — six employees, fifteen-or-so active projects at any given time — and she’d just gotten her annual software bill. Buried in it was a line item she’d been paying for nearly two years: a job costing add-on that integrated with her QuickBooks Online account.
$237 a month. $2,844 a year.
When I asked her why she was paying for it, she gave me the answer I hear all the time: “Someone told me QuickBooks couldn’t really do job costing on its own.”
That’s not quite true. It’s a sales pitch — and an effective one. The reality is that QuickBooks Online Plus already has every feature most contractors and project-based businesses actually need to track job profitability. The features are sitting there, in the software you’re already paying for. They just have to be turned on and used correctly.
This is the system I walk every client through in their onboarding. By the end of this post, you’ll have what you need to set it up yourself.
What “Job Costing” Actually Means (and Why It Matters)
Here’s the mistake almost every business owner makes when they look at their books:
They look at the monthly P&L, see a profit number, and call it a day. “Made money this month — great.”
But that number is an average. It tells you nothing about which jobs were carrying the business and which were quietly losing money. You could have one project subsidizing three others. You could have a “favorite” client who’s actually unprofitable. You’d never know.
Job costing flips the question. Instead of asking “did the business make money?” it asks “did this specific job make money?”
To answer that, every dollar of revenue and every dollar of expense has to be tagged to the project it belongs to. That’s the whole game. Once you can do that, you can pull a report that ranks every job by profit margin — and start making decisions based on which work is actually worth taking.
The 4-Step Setup
There are four pieces to a complete QuickBooks job costing system. Get all four right and the reports tell the truth. Skip any one of them and the numbers will lie to you.
You’ll need QuickBooks Online Plus or Advanced for this to work. If you’re on Simple Start or Essentials, you’ll need to upgrade — but you won’t need anything beyond that. No QuickBooks Time, no Workforce, no third-party project management tool.
Step 1: Turn on Projects
Projects is the foundation. It’s a feature that lets every job operate as its own sub-customer, with a live profit-and-loss report that updates every time you tag a transaction to it.
How to turn it on:
- Click the gear icon in the top right
- Go to Account & Settings
- Click the Advanced tab
- Toggle Projects to ON
- Save
Projects now appears in your left sidebar. When you start a new job, create a project for it — and name it specifically. Not “Smith Job” but “Smith Kitchen Remodel — 2026.” Future you (and your bookkeeper) will thank present you when there are three Smith jobs to keep straight.
Step 2: Build Cost-Coded Items
This is the step most people cut corners on, and the one that quietly destroys the whole system if you skip it.
Go to Products & Services. You’re going to build a list of items that matches the actual cost categories you care about — not generic ones, real ones.
For a typical contractor, that might look like:
- Labor — Framing
- Labor — Finish
- Materials — Lumber
- Materials — Fixtures
- Subcontractor — Electrical
- Subcontractor — Plumbing
- Equipment Rental
- Permits & Fees
For each item, fill in both the sales price and the cost. This is the part everyone misses. If you only enter the sales price, QuickBooks has no way to calculate margin. You’re just invoicing — you’re not job costing.
Pro move: put a cost code in the SKU field. Use 1100 for labor codes, 2100 for materials, 3100 for subs — whatever system you like. It makes your reports cleaner and matches how estimators in construction think.
Step 3: Tag Every Transaction
This is the discipline step, and it’s where most setups fall apart over time.
Every single expense — every bill from a supplier, every credit card charge, every employee hour, every check you cut — needs the project name in the Customer/Project field.
- Bills: When you enter a bill, pick the vendor, pick the item from your product list, enter the amount, and crucially — in the Customer/Project column, pick the project.
- Payroll: If you run payroll through QuickBooks, allocate hours to projects using a weekly timesheet. No QuickBooks Time subscription needed. Manual entry takes about ten minutes a week.
- Mileage and reimbursements: Use the Billable checkbox so you can pass those costs through to the client if your contract allows it.
The discipline part can’t be overstated. If your team tags 80% of transactions to projects and forgets the other 20%, your reports lie to you in ways that are hard to catch. The fix is a checklist and a recurring review — preferably weekly.
Step 4: Add Classes for the Cross-Cut
This is the trick almost nobody uses, and it’s what turns this from “good enough” into a real reporting system.
Projects answer the question “which job?” Classes answer the question “which division?” — or which crew, or which service line.
If you run a contracting business with both residential and commercial divisions, you can tag every project with a class. Now you can pull a profitability report by project and roll those projects up by division. That’s reporting most companies pay third-party software thousands a year to recreate.
To enable Classes: Account & Settings → Advanced → Track Classes & Track Locations. Both come with Plus. Most owners never turn them on.
The Three Reports You Should Be Living In
Setup is half the battle. Actually using the data is the other half.
- Project Profitability — Go to the Projects tab, click into any project, and you’ll see income, costs, and margin in real time. Check this report before you bid the next similar job.
- Profit and Loss by Customer — Reports menu, search “Profit and Loss by Customer.” This shows you every customer and every project side by side. You’ll find your most profitable client in about ten seconds. Probably the one you should fire, too.
- Unbilled Costs by Job — A game-changer for time-and-materials work. It shows every cost you’ve incurred on a project that hasn’t been billed yet. If you’re doing cost-plus contracts and missing items, this report alone will pay for QuickBooks ten times over.
Customize each of these once and save them. Don’t rebuild them every month.
The Three Mistakes That Break the System
Even with everything set up right, three things will quietly destroy your numbers if you’re not careful.
1. Inconsistent tagging. Already covered above, but worth repeating. Tag everything, or the reports become unreliable. Build it into your weekly close routine.
2. Putting overhead into projects. Don’t tag your office rent, your accountant’s fee, or your insurance to a specific project. That’s overhead — it belongs on the P&L as a general expense, not a job cost. Mixing the two destroys your margin numbers and makes profitable jobs look unprofitable.
3. Stale item costs. If lumber prices jump 30% and you don’t update the cost in your Products & Services list, QuickBooks will keep calculating margin based on last year’s prices. Review item costs at least quarterly.
The Bottom Line
Most contractors and project-based businesses don’t need a dedicated job costing app. They need QuickBooks set up correctly and the discipline to tag transactions consistently.
That’s it.
If you set this up this week — Projects on, items built right, transactions tagged, reports saved — you’ll have better visibility into your business than most companies twice your size. And you’ll stop paying $200+ a month for software that duplicates what you already have.
Need help setting this up for your business? At Accounting Fresh, we specialize in cleaning up QuickBooks files and building real job costing systems for contractors and project-based businesses. [Get in touch] to talk about your setup.
Follow @accountingfreshcpa for more “stop wasting money on software” breakdowns.